

How To Draw A Real Eye
Before you start drawing
Three quick things you need to do earlier nosotros get to drawing:
-
Choose a reference photo

Here is the reference flick I'll be using. I chose this one because the eye in it is broad open and you can see the entire iris which makes explaining some steps easier. If you lot want, y'all can cull your own photo and follow my directions.
-
Apply the grid (if you choose to use it)
I divided my picture into smaller parts in Photoshop. You tin can do the aforementioned in MS Paint. Or bank check out a costless app that'll practice that for you – download one from here.
If y'all're calculation the filigree to your own photo, don't use as well many lines. We don't want the picture to exist unreadable. If you have problems with the sketch later, cut a problematic square with an additional line.

If yous're drawing with me, open this image in a new tab and so yous're able to return to it whenever you need without scrolling dorsum to this part.
-
Collect all the necessary tools
Hither is a listing of tools I used:
- Skilful quality paper
If you're here to practice, feel free to use your sketchbook. If y'all're creating a legitimate drawing I recommend working with ameliorate quality paper. I utilise Strathmore Bristol Smoothen paper for most of my drawings. It'southward very popular among pencil artists. And affordable!
- 4B and 6B pencil
My favorite pencils are Faber Castell Goldfaber 1221. What I like well-nigh them the nigh is that I have around 50 of them and not a unmarried one e'er bankrupt. I continue dropping them, they go on keeping their leads in 😉
- Mechanical pencil with a 2B lead
That's the ane I use most often. I could create a whole drawing with it, but I call up information technology's smarter to use softer pencils mentioned above for shading. And so we'll use a mechanical pencil for details.
- Blending stumps
For blending, of grade.
- Makeup brush
Another tool I use to alloy. Information technology works wonders with brilliant shades, where the stump could cause too much smudging. I employ a makeup brush instead of a paintbrush considering it's softer.
- Kneaded eraser
The most important matter in every pencil creative person's toolset. Use information technology for erasing, shading, highlighting, you proper noun it. This eraser can be molded into any shape. Information technology picks graphite off the newspaper, in layers, without leaving any mess. I recommend getting a couple of those, equally you'll employ them often and they'll get dirty pretty quick.
- Pen or pencil eraser
I accept both. Pencil eraser for its convenience and pen eraser for the finest lines.
At present, to the actual tutorial!
How to depict eyes step by step
-
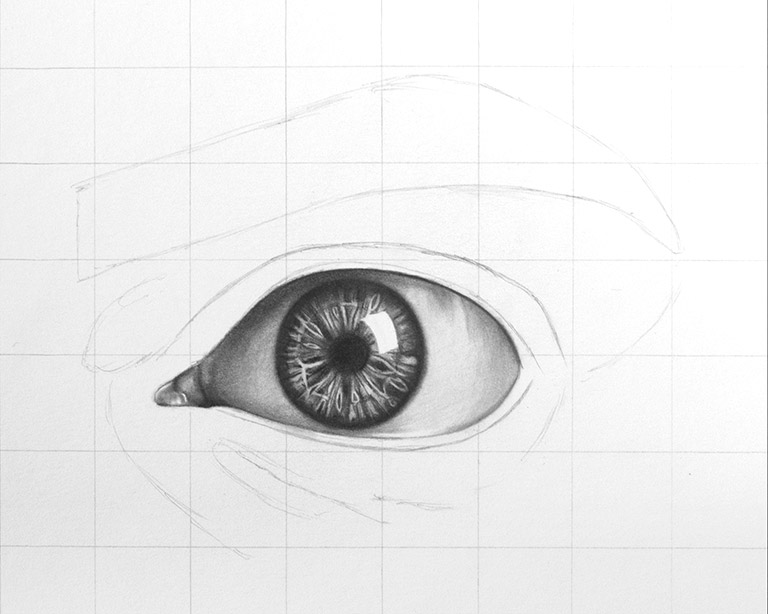
Sketch a elementary eye outline
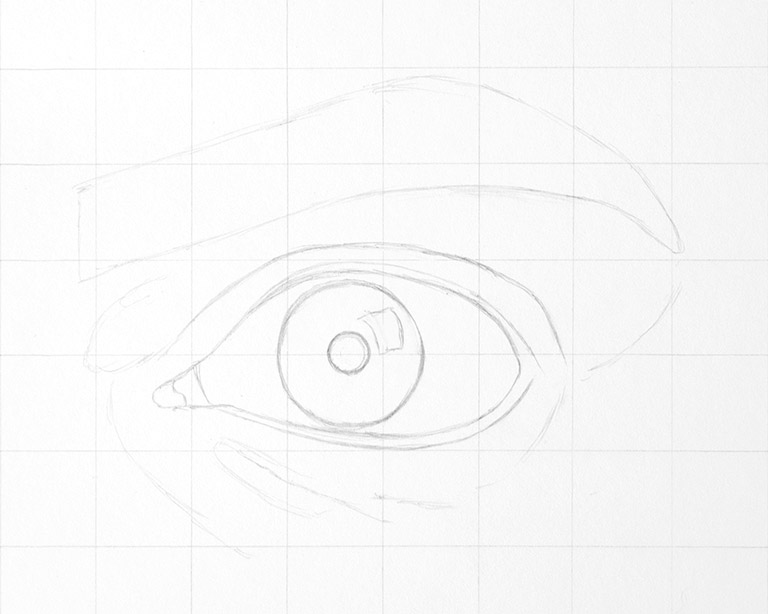
Sketch out all the bones shapes. Then, with lighter strokes, marking the outline of more prominent shadows you lot're able to find at this point.
I started with the pupil and continued adding shapes around it.
How to sketch optics using filigree – proper order
- Student
- Iris
- Calorie-free reflection
- Full general eye outline
- Inner corner elements
- Crease
- Waterlines (eyelid rims)
- More prominent shadows and wrinkles
- Eyebrow
- Line connecting the outer corner with the brow
Hover your mouse over the picture or tap information technology to run into the numbers.
Recollect that the pupil and the iris should exist circles. Be certain to look at them from a slightly dissimilar bending and encounter if they're more than or less circular. Another thing to have in mind is that the student should be right in the centre of the iris.
Now, with every eye comes a spot of reflected low-cal. The shape of it is defined by the light source, like a lamp or a window (in our case it's a window). It's common to notice multiple highlights in your model's center. I unremarkably cull to ignore them – one bigger spot is enough – it makes the center pop and keeps the drawing make clean. You'll reach the best results if the reflection cuts into the pupil, so it's half there and half on the iris.
As far every bit waterlines are concerned, keep in mind that they get thinner closer to the inner centre corner. Visibility of the upper waterline depends on the angle from which nosotros wait at the heart.
Last but not least: be careful with lines that bridge across multiple squares. Afterward you've drawn the contour in each foursquare, await at the whole line once again and smooth information technology out.

Pro tip: When drawing using a grid, e'er remember to bank check what that grid has made you lot exercise. Draw in particular squares separately to ensure good proportions. And then look at the whole motion-picture show and check if the shapes look decent, if they connect smoothly and whether or not you need to move things around a little.
-
Fill the student
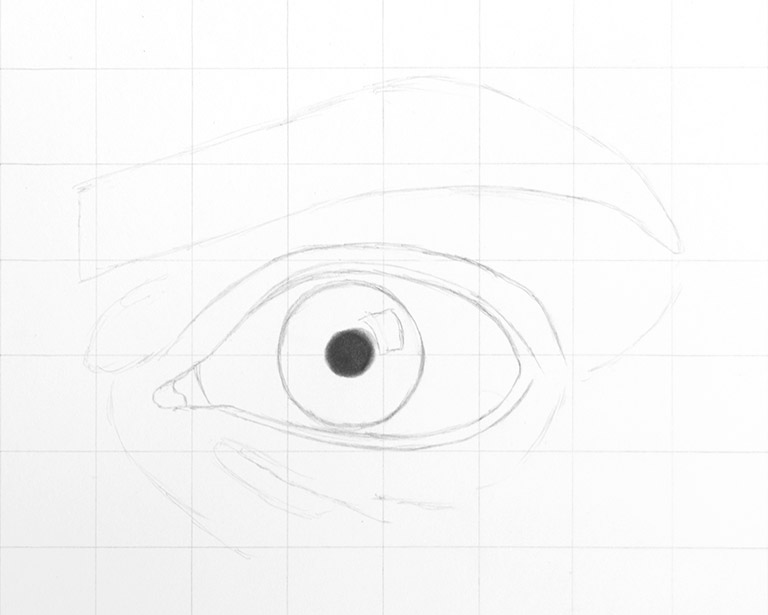
Get-go, you may want to curlicue your kneaded eraser on the drawing a couple of times to brand the sketch less visible. I left it every bit is and so you can see it better.
The darkness of the student volition define the dissimilarity of our cartoon. Fill it in properly, using a soft pencil (at to the lowest degree 4B). Add layers until you accomplish a shade the closest to blackness.
If the highlight on your eye spills onto the pupil, go along that area white! It will be impossible to erase it later without any graphite residue showing.
-
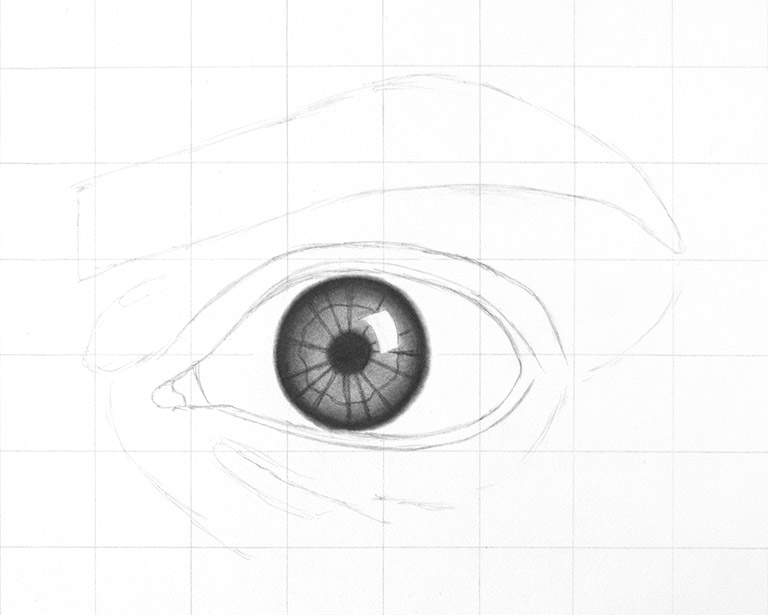
Accentuate the iris

In the side by side couple of steps, I'm going to show you how to draw an iris.
First, fill in the whole iris. Tilt your pencil slightly to go along the strokes soft, similar on the right side of the picture below.

Exit the calorie-free reflection white. It's the second factor defining the dissimilarity. Make it the brightest element of your middle drawing.
Using a much darker shade, define an outline of the iris. Brand that line pretty thick.
If y'all're drawing a unlike eye, in which the lids cover some part of the iris, leave that part unfilled.
-
Alloy the iris

Before whatsoever blending, make sure that you've erased gridlines around the iris. We need that expanse to exist clean because we'll not merely blend the inside, only also the outer border of the iris. If we don't erase these lines, they'll stay visible and trying to erase them later will destroy our perfect blend.
Use a blending stump to smooth the within of the iris. I similar to alloy in the opposite direction to that of the pencil strokes. The truth is I usually cease upwardly blending all over the identify, and then don't remember of it equally a rule.
The last step here is smudging that night circumvolve on the exterior of the iris we've made earlier. Use the tip of a stump to practice that, keeping it slightly tilted.
Pro tip: Using your stumps' tips is the quickest way to ruin them. Yet, I exercise ain that 1 stump that's already had enough and I can damage it a trivial bit more. And so should you.
Start, dilute the dark circle towards the educatee. Then, smoothen out the outer border. If y'all look at any eye, you'll detect that the edge between the iris and the sclera is soft rather than sharp.
-
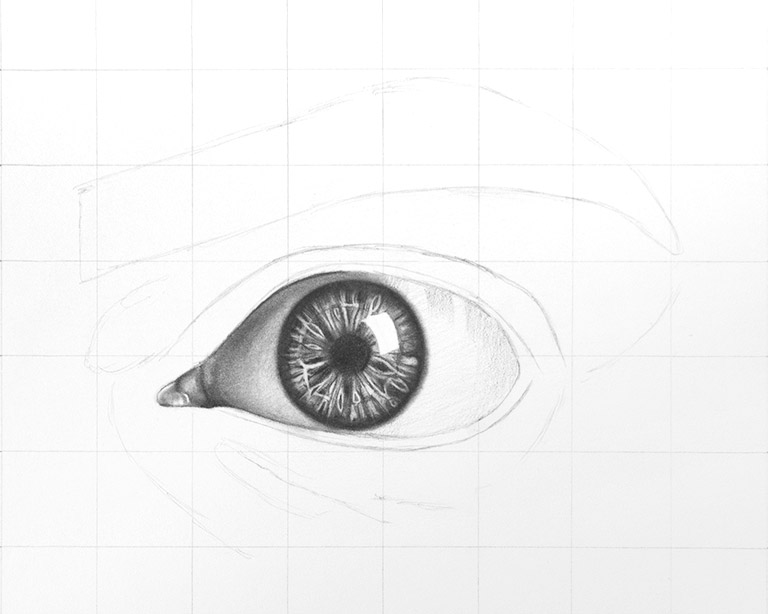
Fill up the iris with some basic lines
If your goal is to create a hyperrealistic eye cartoon, the next iv steps are crucial – we'll draw a detailed iris.
If you feel like it's too much, that's okay. Fifty-fifty without these details, your drawing will look impressive. All these odds and sods may also be redundant if y'all're creating a portrait or a whole person sketch, where you won't be able to see such tiny details anyway. If then, experience gratis to skip to footstep number 9.
Otherwise, draw a wiggly circle around the pupil. This ring commonly separates dissimilar colors, shades or structures in the iris.
Next, add a couple of direct lines effectually the pupil. They should start right in the heart of the student and terminate at the iris border (hover over the image). Make sure the altitude between them is irregular – the whole iris is quite a mess and we want to make information technology as matted as possible.
Pro tip: Use a pencil that'due south a bit worn out and then the lines have some thickness.
-
Add nighttime spots and more lines

Condense the lines: toss in some shorter ones – beginning or ending at the wiggly inner circumvolve.
Add a few double lines that look like orangish vesicles (or teardrops). You can fill them in or non.
Finally, fill in a couple of areas created by the net of lines.
(Hover over the paradigm to come across what I mean)
-
Erase brilliant spots

Look at the reference moving picture and examine the iris structure again.
Can you see all the brighter parts? We're going to rub them out. How cool is that? It's my favorite function of a drawing procedure – actually drawing with an eraser.
Pro tip: Utilize an eraser in the form of a pencil, or an eraser pen, to rub out little details precisely.
As you tin see, I erased a role of a wiggly ring, too as some lines and larger areas. A lot of them, actually. Exercise any you want here. I insist. Have some fun. It's really satisfying to permit go while erasing!
-
Add fifty-fifty more item

It's fourth dimension to accept some fun again.
Add together more "orange vesicles", black or white. Erase some more lines. This time make them fifty-fifty whiter. Experience free to connect a couple of lines then they create trivial veiny structures.
Fix the contrast and add more depth by darkening some areas.
Finish with erasing the big white light reflection properly, making sure it's make clean and has sharp edges (it has to exist the whitest part of the eye drawing)
-
Make full in the darker half of the sclera

Skilful news – we're back to simpler things!The iris parts the eye in the middle. 1 of the halves is normally darker than the other, depending on the direction of light.
I like to draw whatever's on the left beginning because I'g right-handed and I don't desire to smudge my cartoon. That'southward why nosotros're starting with the darker, left part – it's non some important rule established by Da Vinci, no.
Tilt the pencil and fill up in the sclera.
The light source is on the right, and then the left corner will obviously be darker.
-
Alloy it and refine the dark edges

Have your stump and blend what you've simply drawn. Begin with the brighter parts and proceed towards the dark corner. This mode you avoid dragging graphite balance to the areas that don't demand it.
Continue in mind that you're currently shading a ball. Retrieve of how the shadows and lights comport on round objects. If yous find it difficult to imagine, I highly recommend reading this article on how to shade. Information technology'll aid you understand how lite behaves.
Don't forget to refine the outline of the middle, where the lids bandage a minor shadow on the eyeball. Blend it too, especially the lower one. The upper i is non a big deal at this moment – later we'll be covering it with more shadow.
-
Describe the eye corner elements

This is an piece of cake step – just draw what yous see in your pic. Usually, the eye corner is simply a triangle, sometimes it's divided into two chunks.
Blend it and add some white spots with an eraser, then that it looks wet.
-
Fill in the second one-half of the sclera
Make full this function with low-cal pressure. Add a bit more shadow in the corner (ball shading!).
As you can see in our picture, lashes tin can cast shadows on the eyeball. Include them in your eye cartoon by throwing in a few darker lines with a worn out pencil.
Outset them at the upper edge of the eye outline. Brand their length irregular, so the shadow looks realistic. Remembering the three-dimensional shape of the middle, curve these strokes slightly in line with the roundness of the eyeball (hover your mouse over the image)
-
Alloy it with a clean stump

Blend what you've only drawn with a make clean stump. Do not utilize the one yous smudged the darker part with!
The cast shadows should be composite in the same style as they were drawn – with strokes starting at the upper lid. Make sure to lower the pressure on a stump as y'all go away from the lid, so the transition from a shadow to a white-ish sclera is shine.
-
Right the outline

Draw a dark line separating the upper hat from the eyeball connecting it with the one we've made in step 10.
Then, do the aforementioned at the bottom lid but with a lighter tone – there's more than low-cal reaching this office of the centre.
Use an eraser to pause that lesser line with some white, simply similar I did. The centre is wet and information technology ordinarily reflects some low-cal at that place.
-
Right the dissimilarity in the eye
Terminal step earlier we proceed to depict the eyelids:
Look at your movie from a distance and see if it needs any fixes. Add more shadows/highlights where you think the drawing could use more contrast.
I made the shadows on the left side more prominent to increase depth on my drawing. I as well added a shadow below the upper chapeau. If you hover over the image, you lot should see a photo from step 14 overlaying the electric current progress – use that to see the changes I applied.
-
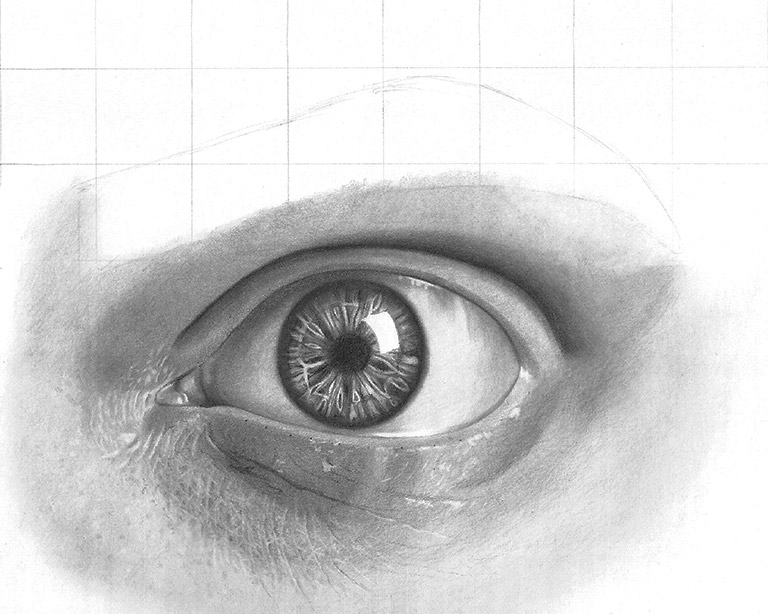
Shade eyelid rims

Let's begin with erasing the outer line on the lower rim almost completely with a kneaded eraser. Leaving it visible is the number one error in realistic eye drawing. Later you've done that fill it with a light shade.
Next, fill the upper rim with a darker tone than the lower one. The transition between both shades in the outer corner isn't very shine – as shortly as the light hits the lower hat information technology becomes brighter than the upper one.
You can probably run across that I besides added some fragile strokes beneath the lower rim.
Pro tip: Earlier I blend a border between ii shades, I like to accept both of them fatigued – adding the 2d shade later may result in some strokes going outside that border and ruining the already smooth expanse of the shade number one.
-
Blend the rims

Polish out both lines, starting with a brighter one. Add some tone variation on the lower rim, like a fleck of reflection in the outer corner.
-
Shade the upper lid and a forehead ridge

Get-go step here – erase the gridlines that cover the upper hat area. I didn't and you can see them showing from under the graphite layer. It's unremarkably possible to blend them with the rest of the image, simply sometimes they exercise stay visible. So don't follow my example hither. Erase the hell out of them.
Adjacent, refine the pucker line – make it really night and rather thick.
Fill up the whole area the fashion I did. Kickoff in the inner corner and finish at the line connecting the pucker with the brow. Retrieve to wearable out and tilt your pencil for that.
Looking at our reference photo you'll see that you should make the left side a fleck darker. Same with the expanse above the crease-brow line. Follow my sketch along with the shadows you can run across in the original pic.
Let's also begin shading the crease. You should add together a gradual dark shade below the crease on the left and to a higher place it on the correct. Wait at the picture to see where the switch actually happens.
-
Blend the area above the eye

Blend everything with a stump and a brush if you have one.
Pro tip: Using a soft castor (preferably a makeup brush) tin help yous achieve better results than a blending stump, specially with brilliant shades.
Cross the eyebrow line a scrap, so that in the side by side steps you're able to smooth the transition betwixt these areas.
-
Refine shadows and highlights

But look at your drawing and decide whether it needs more contrast. I drew more than shadows in the crease area (added one nether the crease on the right side and darkened the rest of them)
I also used my kneaded eraser to create a highlight on summit of the brow ridge.
-
Shade the space betwixt the middle and the nose

But like in pace 19, let's erase the gridlines starting time.
Then, cover the whole area evenly.
Add another layer to darken the shadow next to the base of the nose.
-
Connect it with the upper lid

This is the first part that actually contains the edge of our center cartoon. While blending it, don't forget to fade it out properly to the left side.
Another affair to remember is to cross the countenance outline again.
Connect this part of the skin with the one we've drawn previously so the shading is even throughout the whole upper hat.
-
Add layers below the eye

Again, erase unnecessary gridlines.
Add a few dots on the lower rim line, then that yous can nevertheless see where it should be, even after you lot blend the lower chapeau surface area. Don't worry nigh their visibility – nosotros'll grow eyelashes out of them afterward!
Fill the remaining pare with gentle strokes. Continue adding layers in the areas that need more than shade. Play with some cross-hatching hither o ensure better coverage – change the direction of strokes in each layer by xc degrees.
-
Blend the lower lid

Alloy everything. As ever, begin with lighter tones.
I used a brush to alloy the fair skin at the bottom of the drawing and stumps for all the darker shades.
-
Add more depth

Per usual, expect at your eye cartoon and see if you should enhance the contrast, aka darken the shadows.
You can also draw a couple of wrinkles in this pace. Employ gentle strokes to make the finest of lines.
-
Smooth everything out

If you've added new layers, utilise a stump to alloy them into the residue of the cartoon.
Transitions between shades of the skin should be subtle and soft, so caress them with your castor. Take that aforementioned brush – now you lot have some graphite residuum on information technology – and blend out the edges of your cartoon.
-
Introduce skin texture with highlights

This is another step you can skip if y'all're creating a less realistic piece. If so, spring to stride 30.
Meet all those tiny wrinkles in the centre corner? Information technology's drawing with eraser fourth dimension again!
I used my eraser pen for that – it's super thin and does a swell job with lines.
First, depict some lines and spots in the eye corner, and then move to the skin on the lower lid.
This texture may look complicated, merely I created information technology by just stroking the area in one direction first, and adding some random lines afterwards (preferably in the opposite direction). The goal is to create a pattern that kinda looks like skin cells – a net of tiny lozenges and triangles.
While I had the eraser in my hand, I also added some highlights around the waterline and on the eyeball.
-
Add together a popular of contrast
Considering that all the wrinkles and texture are indentations in the peel, you should pair each highlight with a shadow. Practise it with a worn out pencil or with a tip of a blending stump.
The lite source is on the upper right, so all the notches should have a shadow on meridian or on the correct.
I overlayed this motion-picture show with the one from the previous step to help you run across the changes I applied.
-
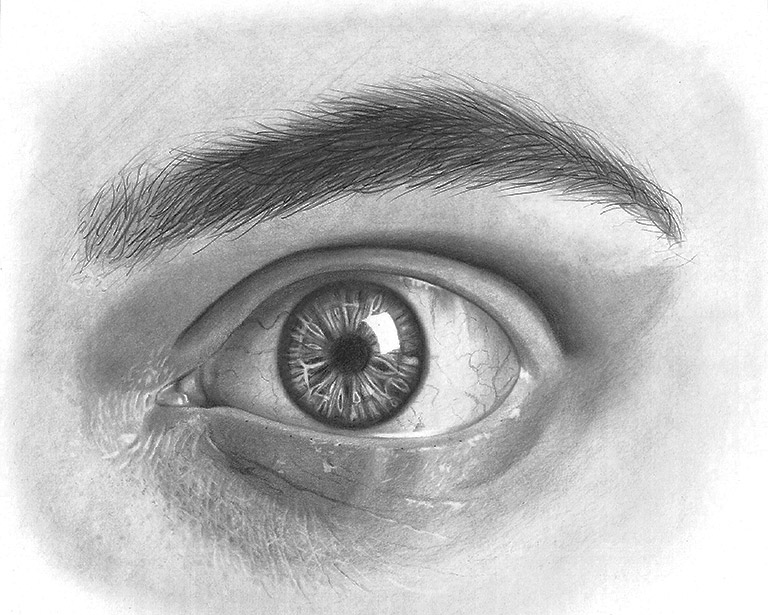
Add veins

While we're at the details, let'southward add some veins on the eyeball.
Describe a few irregular lines varying in shade. They have to be actually sparse, so utilize a rather sharp pencil. Just don't push it likewise difficult. We want them to exist subtle so they don't overshadow the iris. It'south an center drawing, non a cardiovascular arrangement drawing, wink, wink.
-
Fill the brow

Erase the residuum of the grid.
Shade the brow (tilt the pencil, cantankerous-hatch)
Next, fill the countenance with hairs. We'll alloy them next, so yous don't have to be precise even so. Sharp pencil, bold strokes. To see the direction of the hairs better hover over the prototype.
If y'all're using a different reference picture where the forehead is brighter, you may desire to make your strokes softer. Fifty-fifty a subtle alter in the shape or color of the brow can change the confront entirely.
-
Blend for (almost) the last fourth dimension

Blend the pare on the brow beginning. Equally y'all tin can come across, I was a trivial too sloppy with my cross-hatching, and now the strokes are pretty visible. Feel free to do a better chore than I did 🙂 I managed to fix it later with a brush simply why go to so much trouble.
Next, blend the eyebrow so that information technology'south shine simply nevertheless has some texture. That's a fox I utilize to create enough thickness without having to describe every single hair.
If you're drawing a thinner or brighter eyebrow, your blending should exist more gentle than the 1 I did on my eye drawing.
-
Describe countenance hair
Now we're going to have more than fun with the hair.
Start with the left side of the brow. Notice that these hairs abound almost up. They turn to the side above the inner corner of the eye. At the end they turn downwards where they also become shorter than the ones nosotros drew in the centre.
-
Sculpt the forehead bone

By sculpting I mean… calculation more than shadows, yeah! Above the countenance, besides equally beneath it. To practice that, I dabbed my brush in a patch of graphite residue I made on another piece of paper and transferred it onto my drawing.
Per usual, hover your mouse over the image to see the changes I applied.
You should exist able to see that I as well added a subtle layer of graphite on the skin texture/wrinkles under the middle to make them softer.
-
Add lashes
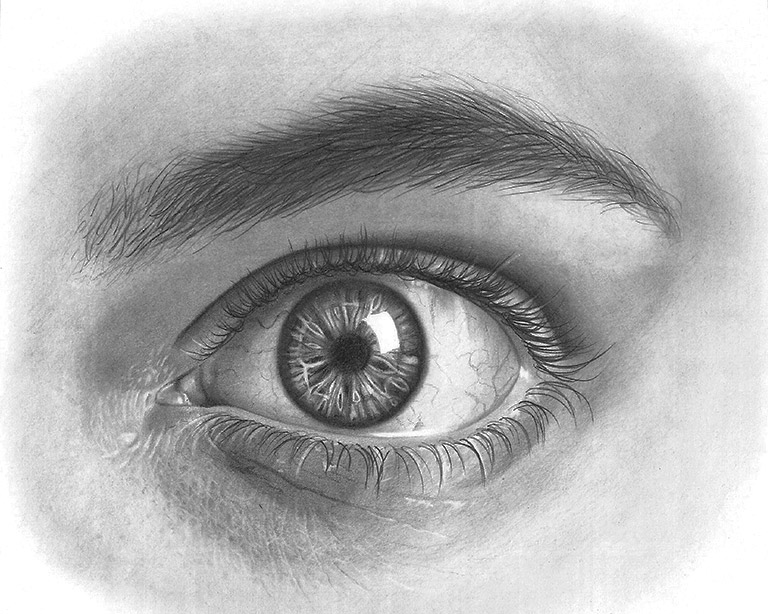
Where you kickoff is crucial to the eyelashes cartoon procedure. They should always grow from the outer line of the lid rim, never from the heart of it!
Look at how the shape of the lashes changes on the heart outline. You may want to look at this eyelashes drawing tutorial to sympathize that function of an eye drawing better.
Placing them irregularly is a fundamental to draw realistic eyelashes.
Don't forget to add together a couple of reflections – use a pen eraser to add some white strokes in the lashes.
-
Apply more skin texture


Source: https://luizacreates.com/blog/eye-drawing/
Posted by: minkgessarcidigh.blogspot.com
0 Response to "How To Draw A Real Eye"
Post a Comment